
Singer 400 Series – Retiming
The main content for this article kindly submitted by Charles Day
Many of the Singer 400 series of domestic sewing machine (including models 413, 416, 418, 427, 457, 466, 477 and 478) were only intended for light domestic use. Whenever any part of the drive train to the needlebar or bobbin has been moved, or replaced, it is necessary to retime the hook so it is in the correct relationship to the needle.
The needle bar has 2 timing marks which are used to set the needlebar position and its relationship to the bobbin hook mechanism.
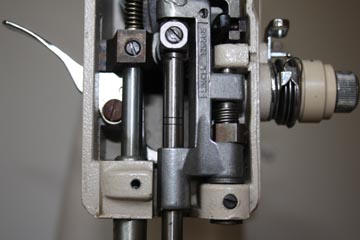
Timing Marks with Needlebar Raised
Setting the Needlebar Height
When the needle bar is in the fully downward position the upper timing mark should be exactly flush with the bottom of needlebar bushing. If it not, then loosen the setscrew on the needlebar lever and adjust accordingly.
Timing The Hook
To prepare the machine, remove the cover from the underside of the base, the needlebar cover plate, the stitch plate and the bobbin. It can be easier later on if the bobbin case is also removed, but this is not essential. It is released by lifting the black coloured bracket about ¼" (6mm) and then sliding it to the right.
Before starting the timing process, make sure that on zigzag machines the needle is set to the central straight stitching position. Double check this by inserting a needle and temporarily replacing the stitch plate and lowering the needle to it. (Do NOT pass the needle through it yet). If the needle is central to the hole in the stitch plate then remove the plate again and continue.
Underneath the machine loosen the 2 setscrews holding the pulley onto the bottom of the bobbin mechanism shaft so that it rotates freely. Working with the machine on its back, hold the pulley still whilst turning the oscillating hook with the other hand so that its hook is pointing to the back of the machine.
Now gently turn the balance wheel towards you until the needle reaches its lowest position. You will see the ‘lower timing mark’ near the top of the exposed part of the needlebar.

Timing Mark
Continue rotating the balance wheel a few degrees until the lower timing mark rises to be exactly flush with the bushing. At this point the point of oscillating hook needs to be exactly aligned with the needle before tightening both of the pulley setscrews under the machine. After tightening the pulley setscrews check that nothing has moved by turning the balance wheel once until the timing mark is again flush with the bushing and check that the hook is just opposite the needle.
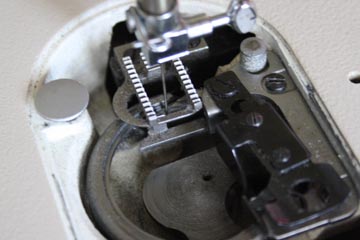
Align Hook With Needle
All that is left now is to put the machine back together. Refit the bottom cover onto the machine, the needle plate,the needlebar cover and finally the plastic cover onto the top arm. Thread up and sew test the machine.