
The Sewing Test
Whenever the mechanism has been disturbed, it is necessary to carry out a sewing test to check the stitch quality under all operating conditions.
Preparing For The Test
When carrying out the sewing test it is essential to:
- Use a 'new' good quality needle of the correct size. Size 14 (90 metric) or smaller is optimum for most standard threads.
NOTE - cheap generic needles can lead to poor quality stitching, no matter how the machine is adjusted, so always use good quality needles. - Use a good quality thread of the correct type and weight for the needle.
Standard polyester dressmaking threads are best suited to a size 12 (metric 80) or size 14 (metric 90) needle.
Using poor quality threads with uneven thickness or slubs can result in their own problems. - Ensure the bottom (bobbin) tension has been correctly preset.
- Check the presser foot pressure is correctly set.
Carrying Out The Test
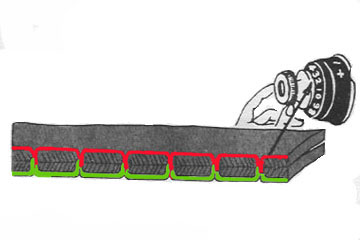
Once the above conditions have been met, it is necessary to make a preliminary test so that the upper tension can be adjusted to give a balanced stitch. That is when the 2 threads lock around each other in the centre of fabric thickness, so that neither shows on the opposite side. This test should be carried out on a double thickness of medium weight fabric. It is easiest to see the stitches if the top and bottom threads are of different contrasting colours that are also different to the fabric colour. i.e. say green and red threads on a white fabric. It is though VERY important that both threads are of the same type and weight.
Balanced Stitch
On machines that have a graduated top tension adjuster with a numbered dial, it may sometimes be necessary to re-calibrate the dial at this stage. Details of how to do this can be found on the Tension Adjustment page.
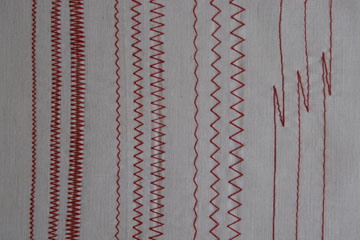
Once a good balanced stitch has been achieved, it is usual to produce a test sample across the range of conditions. This involves making a row of stitches at the shortest, mid-length and longest stitch lengths. On zigzag models, each of these would be carried out as a straight stitch, medium width zigzag and wide zigzag. When a machine is not correctly setup, then issues are often more likely to show at wider zigzag widths.
For machines with a 'reverse' feed function, this should be engaged for a few stitches down each run. If the fabric is turned at a slight angle during reverse feeding, it will prevent the reverse stitching from covering the already made forward stitches. NOTE - on some models the reverse stitch length is not the same as the forward stitch length.
Test Piece