
Singer 400 Series Top Gear Replacement
NEW - Vertical Top Gear #155819

Top Gear #155819
Stock Code : D1294
New vertical top gear for many 400 series machines.
Fits models - 413, 416, 418, 447, 449, 457, 466, 477 & 478
price: £9.75
The main content for this article kindly submitted by Charles Day
Many of the Singer 400 series of domestic sewing machine (including models 413, 416, 418, 427, 457, 466, 477 and 478) were only intended for light domestic use. Over-working these machines on heavy materials, such as denim or leather,is quite liable to break the plastic vertical gear in the top of the machine. This gear transfers the drive to the bobbin mechanism. This type of breakage becomes even more likely as the plastic fatigues with age. Fortunately, replacement of the gear is very easy. Provided the correct procedure is followed, it should take no longer than 15-30 minutes.
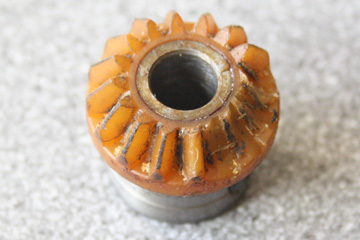
Broken Gear
STEP 1 – PREPARATION:
Remove the needle, needle plate and bobbin from the machine. It can be easier later on if the bobbin case is also removed, but this is not essential. It is released by lifting the black coloured bracket about ¼" (6mm) and then sliding it to the right. Next take off the needlebar cover at the left of the machine and the plastic cover on the top arm by undoing its 2 screws so that the top mechanism is exposed.
The next task is to remove the plastic plate which covers the controls area. To do this unscrew the bobbin winder stop at the top right and then undo the 2 small screws at the bottom of the plate and the 1 at the top. Finally remove the screw on the left side, but note that this screw has a spring retainer inside the top of the machine. It will probably be necessary to stop it turning to remove the screw, but in any case care should be taken not to lose it inside the machine. Set the stitch length lever to zero to make removing the plate easier.
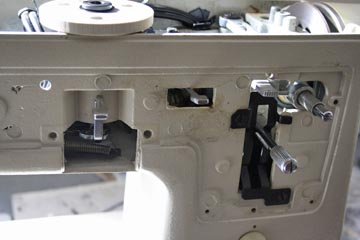
Top Cover & Controls Plate Removed
To the left of the newly exposed area there is an aperture through which the retaining setscrew for the vertical gear can be accessed. There is a small removable panel at the bottom of the aperture held in by 2 screws. It is much easier if this panel is removed, although it is not essential to do so.
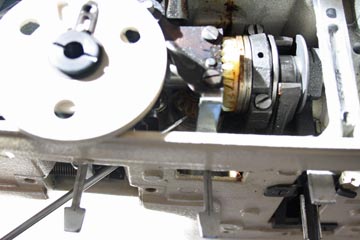
Access Aperture
Carefully place the machine on its back and remove the base panel which is held by a single nut. Remove the toothed belt tensioning cam (single central screw) and take off the timing belt.
STEP 2 – REPLACING THE GEAR:
Rotate the vertical gear so that it’s retaining setscrew is in line with the access aperture. If the gear teeth are broken then turning the balance wheel may not also turn the vertical gear as it is should. In that case turn the toothed belt pulley at the other end of the gear shaft underneath the machine. Once the gear setscrew is in line with the access aperture insert a flat bladed screwdriver and loosen the setscrew. If this is done with the machine upright the gear shaft may drop through. Be careful to avoid the shaft falling out completely, or carry out this step with the machine laid on its back. Once the setscrew is loose, pull the gear shaft downwards by about 1" (25mm) until it is free of the gear. Remove the old gear and replace it with a new one.
Removing Gear
Push the gear shaft upwards again so that it enters the bore of the gear, making sure that the flat at the top is aligned approximately with the setscrew in the gear. Tighten the setscrew whilst applying gentle pressure to the bottom of the shaft to ensure there is no vertical free play in the shaft.
STEP 3 – INITIAL REASSEMBLY:
Reassembly needs to be carried out in 2 stages so that the hook can be re-timed in between them. Replace the small filler panel at the bottom of the access aperture and then refit the plate to the controls area. This is just a reversal of the dismantling procedure.
Underneath the machine, refit the toothed timing belt and the tensioner device so that the belt rides over it. The tensioner should be rotated to give a suitable belt tension which is not loose, but not too tight either. The long length of the belt should deflect about ½" (12mm) if pressed in the middle.
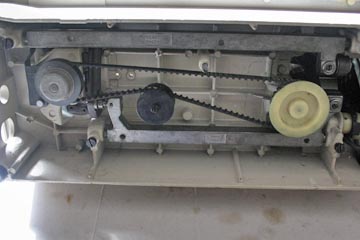
Timing Belt & Tensioner
STEP 4 – RETIMING:
Whenever the timing belt has been removed it is necessary to retime the machine so that the hook is in the correct relationship to the needle.
Before starting, make sure that on zigzag machines the needle is set to the central straight stitching position. Double check this by inserting a needle and temporarily replacing the stitch plate and lowering the needle to it. (Do NOT pass the needle through it yet). If the needle is central to the hole in the stitch plate then remove the plate again and continue.
Underneath the machine loosen the 2 setscrews holding the pulley onto the bottom of the bobbin mechanism shaft so that it rotates freely. Working with the machine on its back, hold the pulley still whilst turning the oscillating hook with theother hand so that its hook is pointing to the back of the machine.
Now gently turn the balance wheel towards you until the needle reaches its lowest position. You will see the ‘lower timing mark’ near the top of the exposed part of the needlebar.

Lower Timing Mark
Continue rotating the balance wheel a few degrees until the lower timing mark rises to be exactly flush with the bushing. At this point the point of the hook needs to be exactly aligned with the needle before tightening both of the pulley setscrews under the machine. After tightening the pulley setscrews check that nothing has moved by turning the balance wheel once until the timing mark is again flush with the bushing and check that the hook is just opposite the needle.
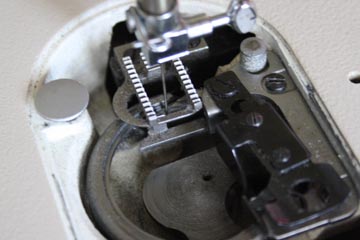
Align Hook With Needle
STEP 5 – FINAL REASSEMBLY:
All that is left now is to put the machine back together. Refit the bottom cover onto the machine, the needle plate,the needlebar cover and finally the plastic cover onto the top arm. Thread up and sew test the machine.