
Singer Oscillating Shuttle Machines – Retiming
Ensuring that the needle/shuttle timing is correct for oscillating shuttle machines (VS, 27/28K, 127/128K models) is a 4 step process. The first step is to ensure that the needle bar is set to the correct height. After this the height of the shuttle carrier must be checked and the shuttle clearances set. Only when these are all correct can the timing of the shuttle can be checked and if necessary adjusted.
Setting the Needlebar Height
Turn the balance wheel towards you until the needle bar reaches its lowest point. In this position the gap between the bottom of the needle stop screw 'C' in the needle bar and the top of the throat plate 'E', should be 13/16". TIP - use the shank of a 13/16" drill as a gauge.

Needlebar Height
If the height of the needle bar needs to be reset, then loosen both screws 'D' in the needle bar clamp and adjust its position accordingly, before tightening them again and then re-checking the gap. The range of adjustment is approx. 1/32". If this range is not sufficient to ensure the correct setting, then the needle bar cam and pin should be checked for wear, and if necessary replaced.
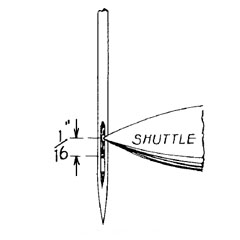
Shuttle Carrier Height
Insert a needle fully into the needle clamp and then rotate the balance wheel until the point of the shuttle reaches the centreline of the needle. The point of the shuttle should then be 1/16" above the top of the needle eye. Slight corrections can be made by bending the shuttle carrier arm close to where it is mounted onto the bell crank. Care must be taken not to over bend the carrier arm or it may foul the slide plate, or it can prevent the correct formation of stitches.
Shuttle Carrier Height
Shuttle Thread Clearances
The shuttle clearances need to be checked in 4 positions using a narrow 0.018" (0.45 mm) feeler gauge. The points to be checked are the gap between the shuttle and the raceway where the shuttle starts to curve in towards the point,the gap between the heel of the shuttle and the raceway, the gap between the end of the shuttle and the carrier and the gap between the shuttle body and the carrier spring.
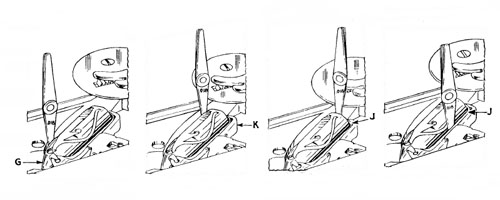
Shuttle Clearances
The clearance between the shuttle and the raceway can be adjusted by loosening the screw that connects the carrier to the belt crank. The clearance between the end of the shuttle and the carrier spring can be adjusted by slightly bending the carrier spring.
Shuttle Timing
It is important that the above checks are all made before checking shuttle timing. The procedure for timing the shuttle varies depending upon whether the machine has a timing mark in the shuttle raceway.
For machines without a timing mark:
Turn the balance wheel towards you until the needle reaches its lowest point and then rises 3/32". That is when the gap between the bottom of the needle stop screw and the throat plate is 29/32". At this point the point of the shuttle should align with the centreline of the needle.
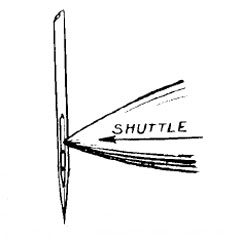
Shuttle Timing
For machines with a timing mark:
With the machine supported upside down, turn the balance wheel towards you until the needle reaches its lowest point. At this position the tip of the shuttle point should align with the timing mark 'M' in the shuttle raceway.
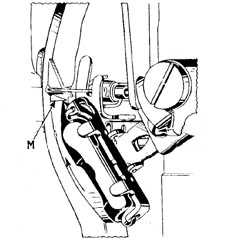
Timing Mark
Adjusting the shuttle timing:
The timing of the shuttle is adjusted by the eccentric pin in the pitman link. The procedure is slightly different depending upon the model. For 27K/127K machines - after loosening the lock nut 'S' the eccentric pin 'T' should be turned until the high point of the eccentric is facing towards you (the back of the machine) and then rotated to the right (clockwise) until the point of the shuttle reaches the timing mark 'M'. For 28K/128K machines - the procedure is similar except that the starting position is with the high point of the eccentric away from you (to the front of the machine).
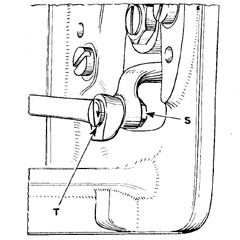
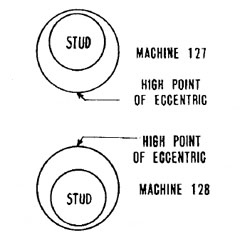
Timing Adjustment